Introduction
In this article, I will discuss the implementation of web identity federation to access an AWS S3 bucket. Web identity federation is the process of simplifying the authentication of users for the application. This allows users to log in to the website without creating an account, but rather verifying their identity with Google, Facebook, or similar services where they already have accounts.
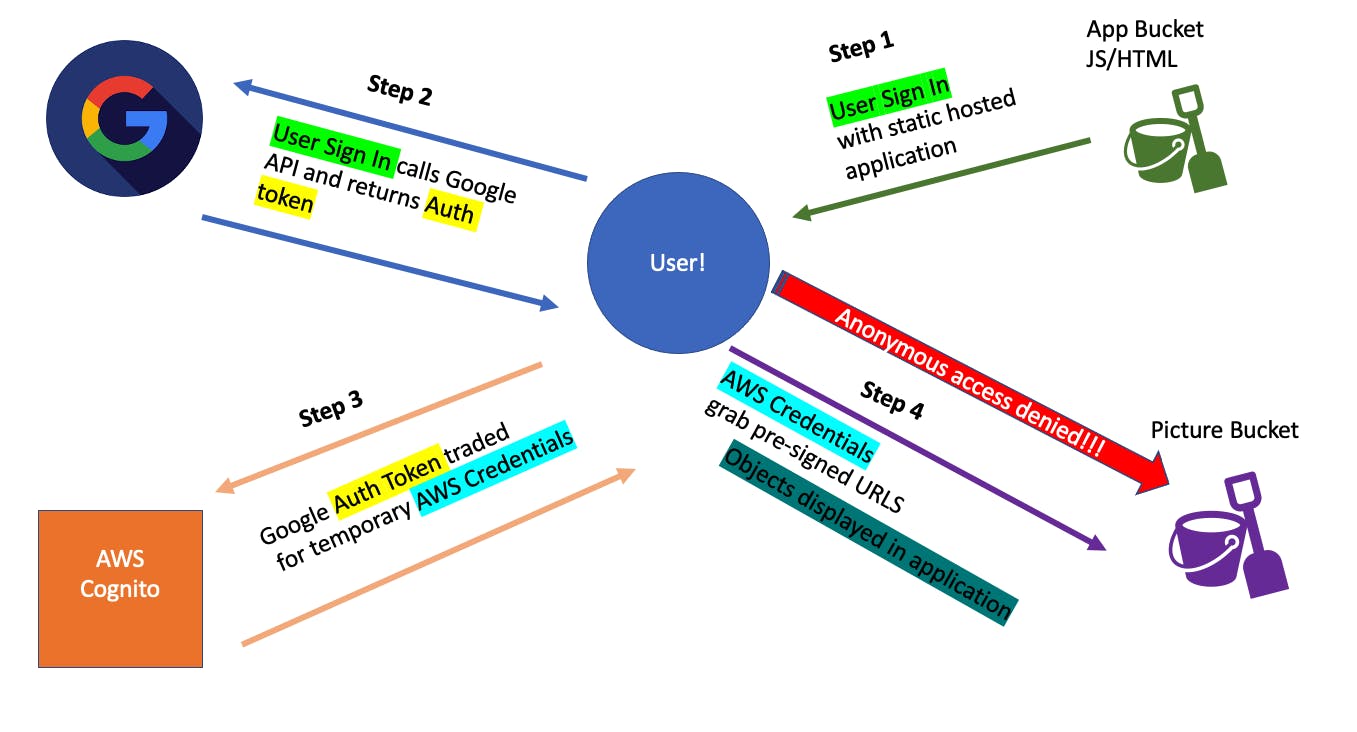
This demo that I am using has a base Cloud Formation template to create multiple S3 buckets. One bucket will store the application code that includes an HTML file and a JavaScript file. I will be editing these files to add the necessary authentication details from the Google and AWS services. I will be creating Google authentication, AWS Cognito, and IAM roles.
The authentication will allow us to access dog pictures located on a private S3 bucket. To start, I run the base Cloud Formation template to set up the buckets and other services.

These buckets are straightforward and fairly easy to create, but the Cloud Formation template saves time. I'm focusing on the authentication side of things today.

The application bucket will contain the index.html and script.js file. I will enable static website hosting from this bucket and use the given endpoint to access the running application. The "block all public access" setting is off. This allows for static hosting.
The private bucket holding our dog pictures does not allow anonymous users to access it. I will create the authentication necessary to access this bucket. This bucket will also have a policy that allows for getObject and listObject.
Use the Google API to get authentication credentials
This is a pretty straightforward process. I navigate to the Google API console and create a project. This will give us the necessary information to link our application to Google Authentication.

Next, I needed to configure the content screen. This will allow me to choose the appropriate authentication.
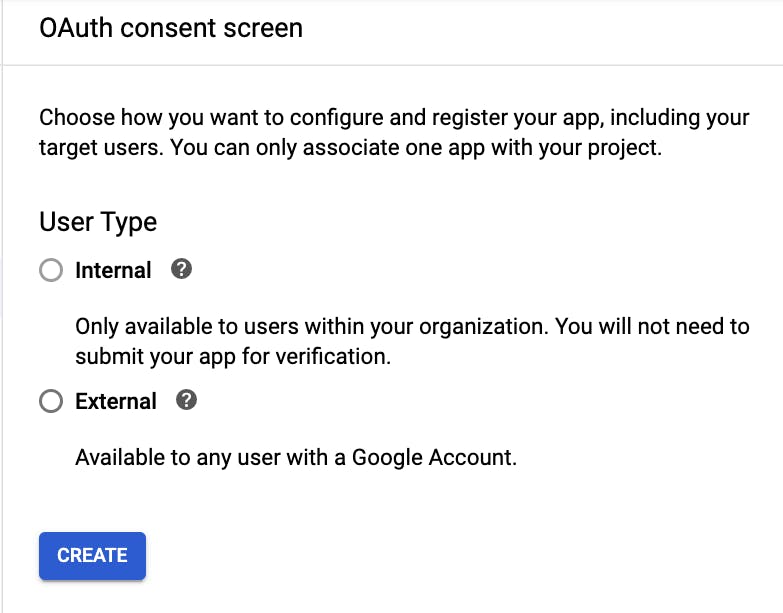
The goal is to allow this application to be accessed by any users who navigate to the page. Allowing external users, available to those with a Google account, makes the most sense. Internal users are those within an organization. The goal of this application is to allow anyone who has the appropriate credentials to access the pictures.
With all that configured, it's time to create the credentials that will be passed to the application.
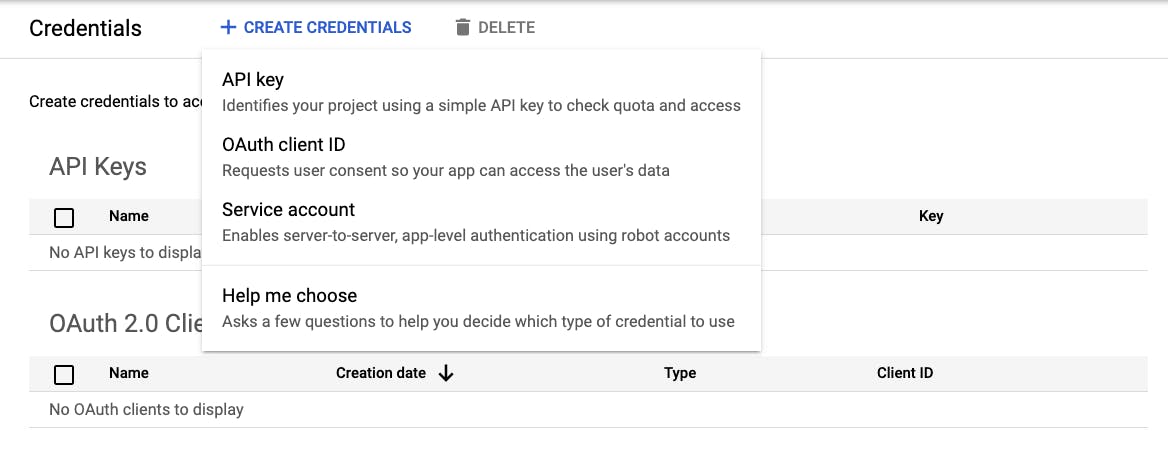
OAuth Client ID credentials make the most sense for our use case. It is necessary to create an Authorized JavaScript origin. From the application S3 bucket, I will enter the endpoint for the URI.
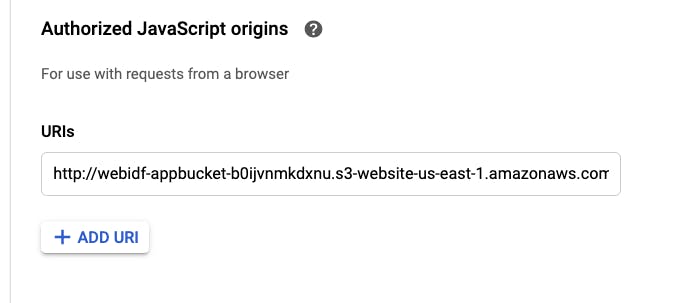
Once the URI is added, I was given two pieces of information. The Client ID and Client Secret. These two pieces of information will be used in our application files later on. With all that being done, the google API authentication is properly configured.
Cognito Identity Pool - Exchange Google Token for Valid AWS credentials
I now have all the proper credentials from Google to authenticate a user, but AWS resources can not be accessed by Google authentication tokens. They can be exchanged for AWS credentials that will allow access to the private S3 bucket containing the pictures. Basically, we need to do a simple trade.
Google Auth credentials <-> temporary AWS credentials
The question is, how do I make this trade? What services do I use?
This is where AWS Cognito comes in. It will allow for all the above actions to occur. The temporary AWS credentials will give the user an IAM role granting access to the S3 bucket.
In AWS Cognito, I am prompted to choose between 'Manage User Pools' and 'Manage Identity Pools'. User pools are used to manage a store of identities. Identity pools are used to do the transfer of credentials outside of AWS for the AWS credentials. This is exactly what is needed for the application. I start creating an identity pool.

I chose to use an authentication provider. This is where I will connect AWS to Google. Under authentication providers, I can supply the Google Client ID we got earlier in the process.

I now have the temporary IAM roles that will allow access to AWS. The identity pool ID is now available in Cognito. This will be used later on in the application files.

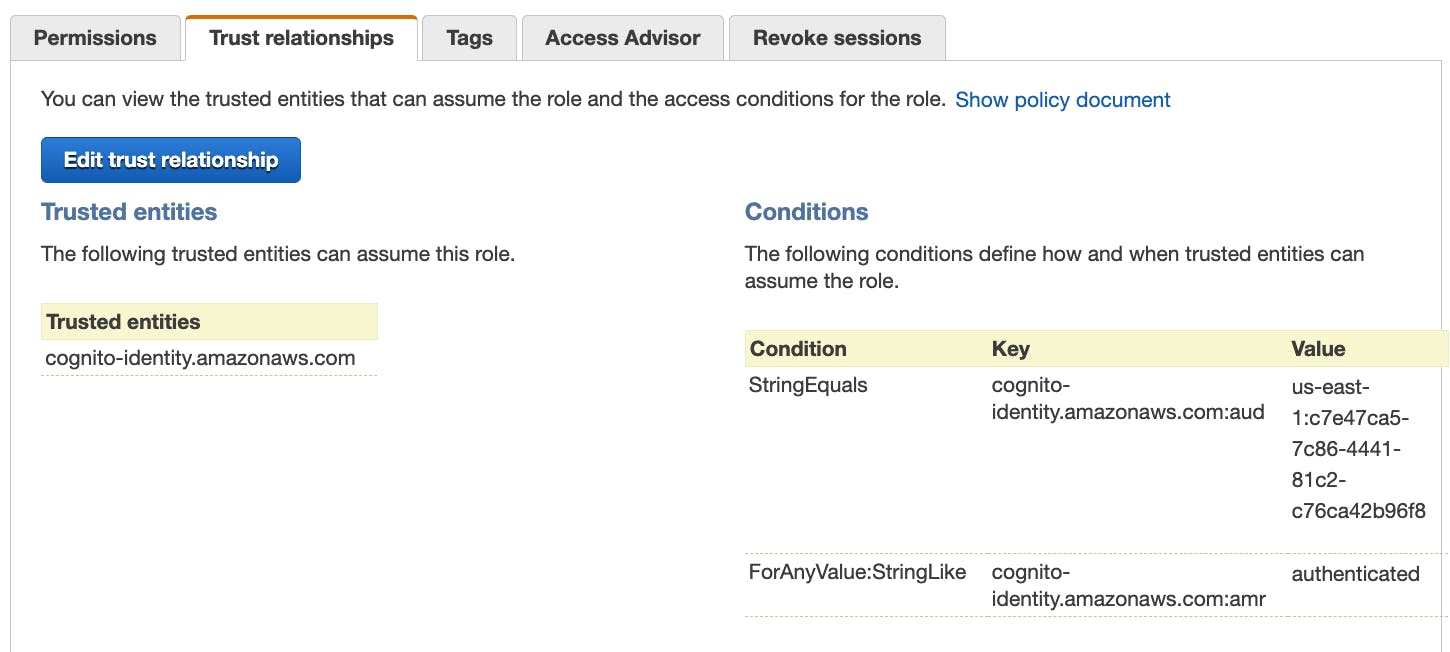
The IAM roles are not yet configured to allow S3 access. I navigate to the role and check the trust relationship. It shows that our identity pool ID is the only one given access to the role. This is just a quick double-check to make sure it's configured correctly.
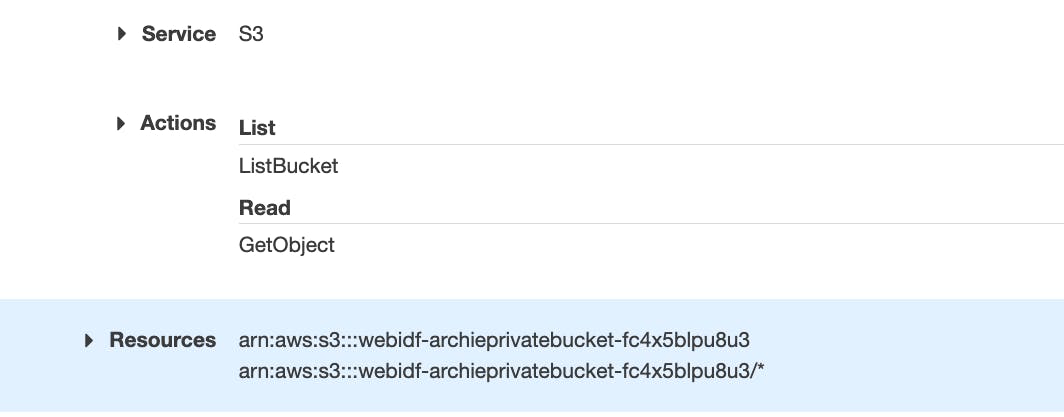
Next, I update a policy on our IAM role. Adding policies is something that I have used countless times in the past. It's a very common pattern that you need when working with AWS. I add a policy that allows for S3 bucket access via the "S3:ListBucket" and "S3:GetObject" permissions.
Configure HTML and JavaScript
In this demo, I have some JavaScript and HTML files that were already created. I will be editing the necessary information to allow the correct authorizations to occur.
I update the HTML file with the Google Client ID. This is the ID that is used to call the Google API and verify authentication. Here is the snippet of HTML code below.
<html lang="en">
  <title>PetIDF Demo</title>
  <head>
    <meta name="author" content="acantril" />
    <meta name="google-signin-scope" content="profile email" />
    <!-- Google Client ID -->
    <meta
      name="google-signin-client_id"
      content="1015301556919-qv3phuj35anptvadocjndcoi0rneh3p1.apps.googleusercontent.com" />
    <script src="https://apis.google.com/js/platform.js" async defer></script>
    <script src="https://sdk.amazonaws.com/js/aws-sdk-2.2.19.min.js"></script>
    <script src="scripts.js"></script>
  </head>
  <body>
    <div class="g-signin2" data-onsuccess="onSignIn" data-theme="dark"></div>
    <p />
    <button onclick="onSignOut()">Sign out</button>
    <p />
    <div id="viewer"></div>
    <div id="output"></div>
  </body>
</html>
Our HTML will create a "sign-in" and "sign-out" button. Each button will run JavaScript functions. The sign-in button will call the JavaScript function below. If the user's Google login is correct, they will receive the Google Authentication token.
This JavaScript function will make the trade by utilizing AWS Cognito.
Google Auth Token <-> AWS temporary credentials
function signInCallback(authResult) {
  if (authResult['access_token']) {
    // adding google access token to Cognito credentials login map
    AWS.config.region = 'us-east-1';
    AWS.config.credentials = new AWS.CognitoIdentityCredentials({
      IdentityPoolId: 'us-east-1:c7e47ca5-7c86-4441-81c2-c76ca42b96f8',
      Logins: {
        'accounts.google.com': authResult['id_token'],
      },
    });

    // obtain credentials
    AWS.config.credentials.get(function (err) {
      if (!err) {
        console.log(
          'Cognito Identity Id: ' + AWS.config.credentials.identityId
        );
        // test aws
        testAWS();
      } else {
        document.getElementById('output').innerHTML =
          '<b>YOU ARE NOT AUTHORISED TO QUERY AWS!</b>';
        console.log('ERROR: ' + err);
      }
    });
  } else {
    console.log('User not logged in!');
  }
}
The testAWS function calls the S3 bucket to listObjects. This will grab the contents of our S3 bucket. I update the file to include the appropriate bucket name.
function testAWS() {
  var s3 = new AWS.S3();
  var params = {
    Bucket: 'webidf-appbucket-b0ijvnmkdxnu',
  };

  s3.listObjects(params, function (err, data) {
    if (err) {
      document.getElementById('output').innerHTML =
        '<b>YOU ARE NOT AUTHORISED TO QUERY AWS!</b>';
Later on in the function, we can see how it grabs the necessary pre-signed URLs from our bucket.
 var url = s3.getSignedUrl('getObject', {
          Bucket: data.Name,
          Key: photoKey,
        });
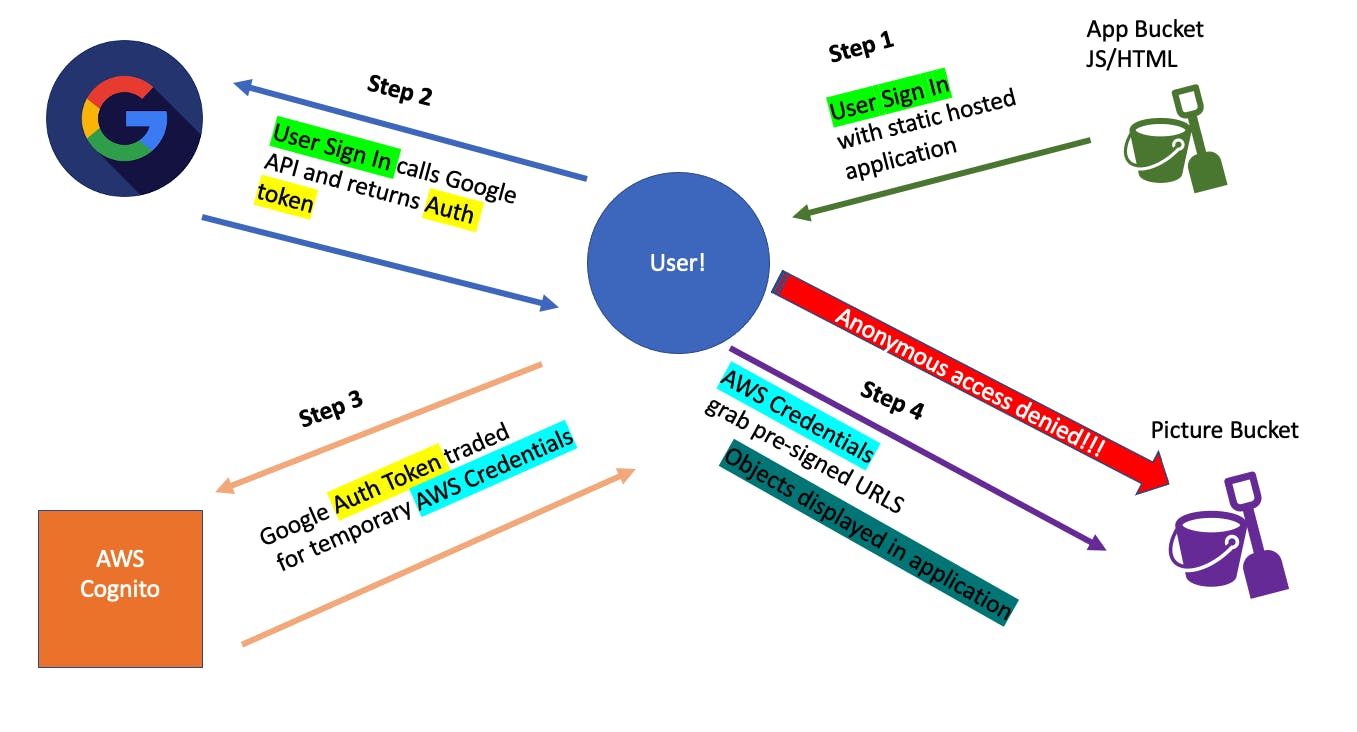
Here's a recap of how all the code works:
- User Login Credentials to Google Auth
- User Receive Authentication Token
- Authentication Token traded for AWS temporary credentials
- AWS temporary credentials allow access to the S3 bucket
- listObjects called on S3 buckets and pre-signed URLs are created
- Pictures in the bucket are displayed
With the files successfully updated and saved, I re-upload them to the S3 bucket. Now, I can go to the S3 endpoint to access the functioning application.

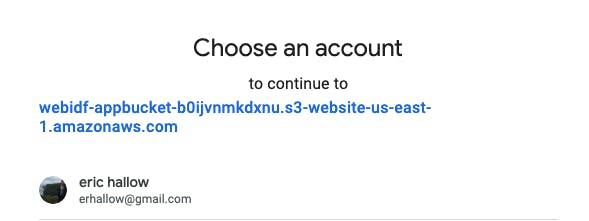
I click the Sign-In Button and I am prompted to log in via Google.
Error!
I ran into an error and I wanted to discuss my thought process in debugging the problem.
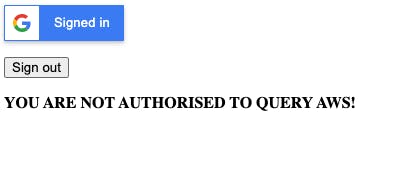
I navigated to the AWS Cognito platform and was able to check if the log-ins were made successfully. I had attempted to log-in twice and it worked both times.

Because the log-ins were correct, the problem had to be with getting access to the buckets. I navigated to the console in the web browser and found these error messages.
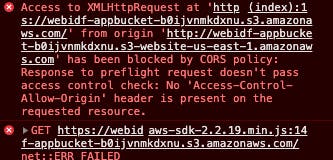
I checked the CORs configuration and it was correct. I checked the bucket policy and it was correct. There is an error with GetObject. Why is there a problem calling the S3 bucket? All the information in the policies and the JavaScript code seemed correct.
Well....I put the wrong bucket information into the script.js. I entered the information for the application bucket, rather than the bucket holding our pictures. This is why I was getting the CORs and GetObject errors. The application bucket did not have CORs configured and there was no bucket policy allowing GetObjects to be called. I quickly fixed this by entering the bucket that contains the pictures and reuploaded the script.js.
It was a simple mistake. As always, making the mistake and going through the process of finding out the problem is a great learning process. Nothing enhances my understanding better than debugging the processes I configured.
A few seconds later and we had pictures of my 5-year-old beagle/dachshund mix named Archie loading up through a sign in!
Success!

Well-Architected Framework
Now, I will discuss how this infrastructure fits in the AWS Well-Architected Framework.
Operational Excellence
Operations as code
The JavaScript in this project is used to manage operations. When the Sign-In button is clicked, this process we saw earlier is run:
- User Login Credentials to Google Auth
- User Receive Authentication Token
- Authentication Token traded for AWS temporary credentials
- AWS temporary credentials allow access to the S3 bucket
- listObjects called on S3 buckets and pre-signed URLs are created
- Pictures in the bucket are displayed
The user is able to interact with the Google API and trade token for AWS credentials. This assigned them an IAM role. All this is done in code!
Make frequent, small, reversible changes
In order to add more functionality, I can make incremental changes to the code or the AWS services. The IAM role can be changed to give the user greater permissions. There are a wide variety of small changes that can help enhance the application or the backend processes. Those changes would be small and easily reversed.
Learn from operational failures
I made a small operational error by using the wrong bucket name. I discussed this in the blog so the next person doesn't get stuck with an error like this.
Security
Implement strong identity foundation
This is accomplished by using AWS Cognito. The users get temporary credentials with the least permissions necessary. This allows the user to only view the data and not manipulate it.
If I wanted to enhance traceability, I could add AWS X-ray or CloudWatch to get more information on how the users are interacting with the application.
Recap
For my use case, these Pillars of the AWS framework I discussed apply more directly than others. If I were to enhance my use case, I would go into more depth on performance efficiency and cost optimization.
Thanks for reading!
I appreciate everyone who made it this far! I am looking for Junior opportunities working with AWS.
If you would like to contact me:
- Check out the resume I built on AWS: Cloud Resume
- Connect with me on LinkedIn or follow me on Twitter
- Thanks to Adrian Cantrill for the great demo, check out his courses: https://learn.cantrill.io/
