


Introduction
In this article, I will explain to you how I built a Site to Site VPN from an AWS Virtual Private Cloud (VPC) to an on-premise environment utilizing Border Gateway Protocol (BGP) to configure the routes.
I will discuss the topics below:
- Set up the environment
- Transit Gateway, VPN, Customer Gateways
- Create VPN endpoints
- IPSec tunnels for on-Premise Routers (CGW)
- BGP Routing and Testing
- How this setup applies to AWS Well-Architected Framework
- Takeaways
Setting up the environment
The goal is to connect an AWS VPC to a Customer's on-premise network. We want this connection to be secure and highly available.

To start this demo, I utilized two cloud formation templates. The first template would create the AWS side of things: VPC containing two EC2 instances in different subnets + Transit Gateway as a connection point for the VPC. The second template would create a simulated on-premise customer environment: two routers and two separate servers. These cloud formation templates were provided as a part of the demo. I will be demonstrating how I created the Site to Site VPN connection between these two environments.
Transit Gateway, VPN, Customer Gateways
Create Customer Gateways On-Premise
To start, I created two customer gateways to access the simulated on-premises environment. This would allow the customer environment to be highly available. In the real world, these gateways would need to be in two separate physical locations to ensure availability.
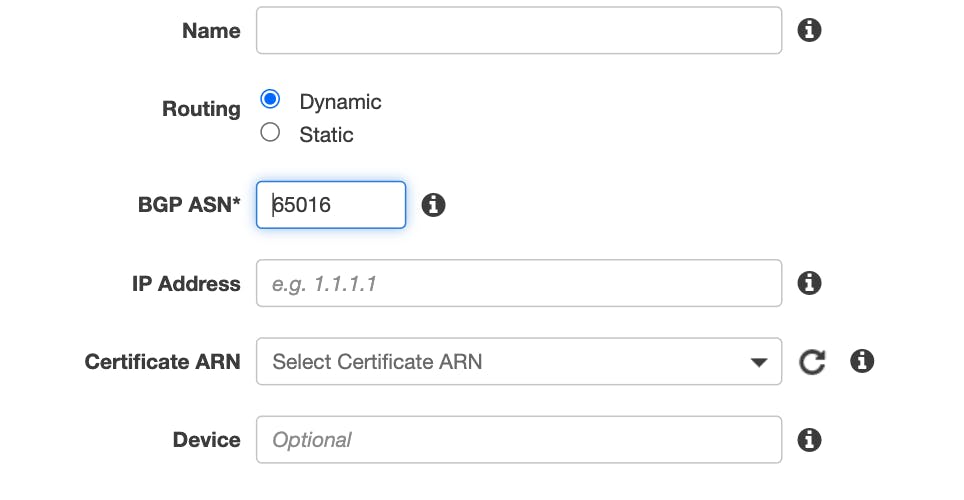
These routers were configured to be dynamic allowing for us to use the BGP routing. I utilized a private Autonomous System Number (ASN), which ranges from 64512 to 65534. The IP address associated with the customer gateway is the public IP address of the router.

Create VPN Endpoints
From the Transit Gateway, I will be creating VPN endpoints to create a secure connection to the customer gateway. I navigate through the AWS console to the Create Transit Gateway Attachments.
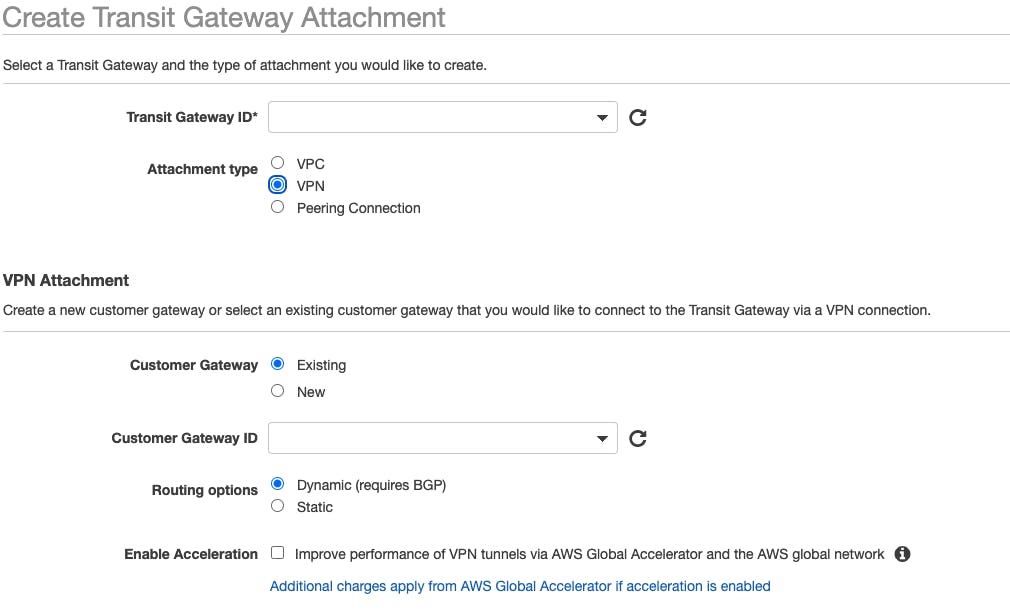
I selected the Transit Gateway, deployed through the CloudFormation template, and I created the VPN attachment to the on-premise customer gateway. I made sure to enable acceleration to allow the AWS global accelerator to speed up our routing traffic. It utilizes the many AWS edge locations to achieve acceleration. We repeat this step for each of the customer gateways. This creates two separate VPN connections to two separate gateways.
IPSec tunnels for On-Premise Routers (CGW)
Create and Configure IPSec Tunnels
From each VPN endpoint, we can now create multiple IPSec tunnels. The tunnels span from the VPN endpoint to the Customer Gateway. They utilize a preshared key creating a connection via the tunnels. These tunnels allow our data to be encrypted as it passes through the public internet.
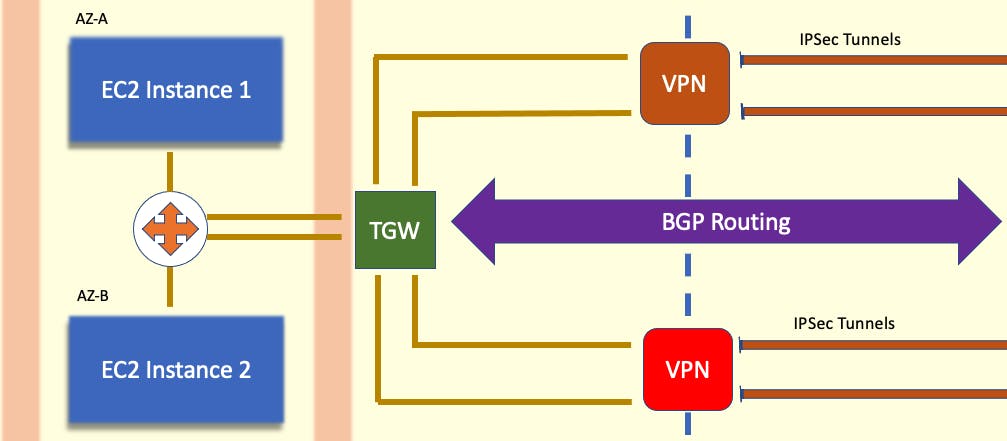
To simplify the images we have previously seen, this is what the connection flow looks like:
TRANSIT GATEWAY -> VPN ENDPOINT -> IPSEC TUNNELS -> CUSTOMER GATEWAY
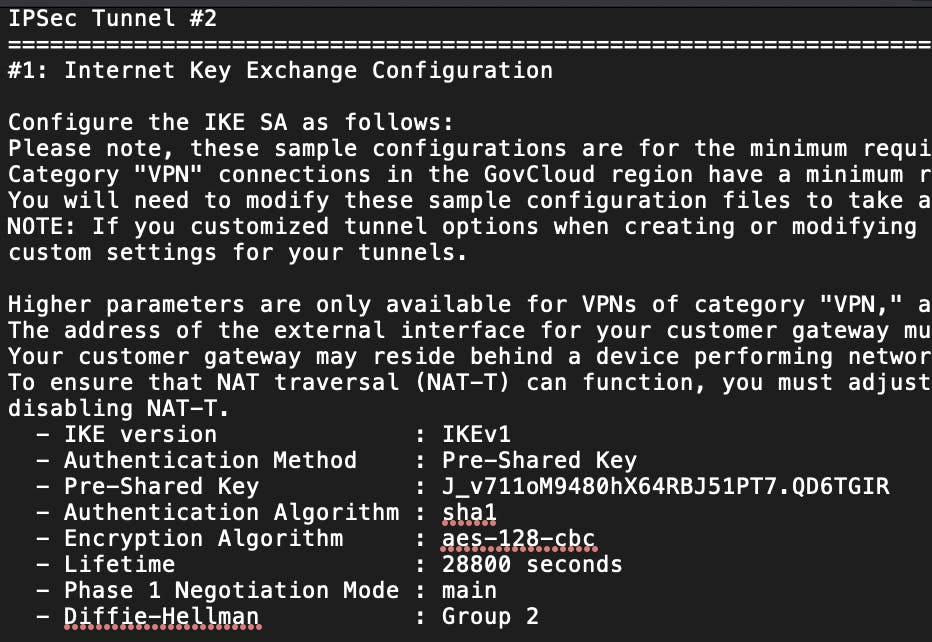
To set up the IPSec tunnels, we need to gather information from the VPN connections. I downloaded configuration files after right-clicking on each Site-to-Site VPN connection listed in the AWS console. Each configuration file contained information for 2 IPsec tunnels.
In this file, we can find the pre-shared key.
We can also find the Inside and Outside IP addresses.
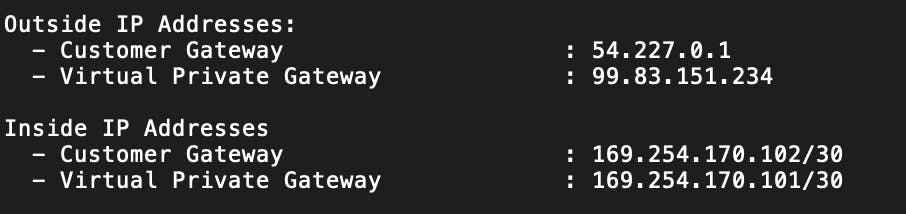
Lastly, we can find the BGP IP address here.

The outside IP addresses allow us to configure the IPSec tunnel itself. The inside IP addresses set up the information flow inside the tunnel, which will be using BGP.
Within the IPSec tunnels, we can now have the option of using BGP.
Outside IPs = tunnel setup Inside IPs = BGP route set up inside of the tunnel
With this information, we will use the session manager in our EC2 instances to configure the IPSec tunnels. Through the command line and nano, we update our files: ipsec.conf, ipsec.secrets, ipsec-vti.sh.
- ipsec.conf file will configure the tunnels using appropriate outside IP addresses of the customer gateway and the AWS endpoint.
- ipsec.secrets will contain the outside IP addresses and the pre-shared key
- ipsec-vti.sh is a script that brings up the IPSec tunnels. We will configure the inside IP addresses

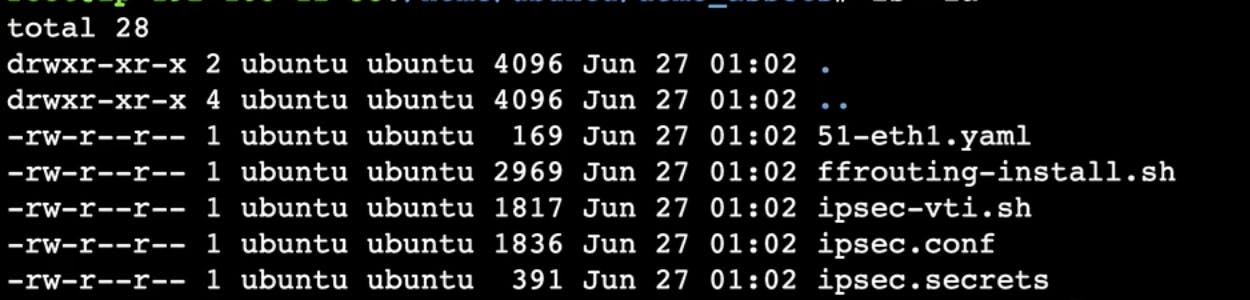
As shown above, I used the command lines to copy these files into the correct directory and make the script executable.
In the AWS console, we can navigate to our Site-to-Site VPN connections and check the tunnel details. On the right, you can see that IPSEC IS UP. This means that our tunnels are configured correctly. The tunnel status says DOWN. This is because we have yet to set up our BGP routing.

BGP Routing and Testing
Enable BGP On-Premise
To enable BGP from AWS to on-premise, I will configure the customer gateways to use BGP. This will set up the IPSec tunnels to allow BGP to exchange routing information between AWS and the on-premise environment.
I opened up the on-premise router and started a session with the session manager. From here, I ran this ffrouting script and installed it on the router.

Associate AWS with On-Premise
Once the script is done installing on the router, we can now associate the AWS environment with the on-premise environment. For each of the tunnels, we use the session manager again and run some command line prompts. We configure AWS to be the neighbor of the on-premise.

Success! You can see above that the tunnels are up and they allow 2 BGP routes. Our AWS VPC now has a secure connection to the on-premise customer gateway! This is the end of the demo that I completed, but I would still like to discuss how all these services fit into the AWS Well-Architected Framework.
AWS Well-Architected Framework
These are a few pillars that we utilize in our infrastructure design:
Operational Excellence
Anticipate Failure
We anticipate failure with this infrastructure by setting it up for high availability. There are multiple VPN endpoints, Customer Gateways, and EC2 instances. The Customer Gateways (in a real-life scenario) would be placed in two different physical locations. Our EC2 instances are in different Availability Zones.
Make frequent, small, reversible changes We can grow this infrastructure incrementally as our business changes. If we wanted to establish a Direct Connect (DX) between the AWS environment and on-premise, we can utilize the Site-to-Site VPN while the direct connect is being established.
Security
Protect data in transit and at rest
This is the pillar that specifies that we encrypt data in transit and at rest. We successfully did this by configuring the IPsec tunnels that travel over the public internet. We have the option to configure this connection with a more simple path, but that would lack the encryption we need to pass data with confidence.
Reliability
Scale horizontally to increase aggregate workload availability
On the AWS side, we have multiple EC2 instances in our VPC. As we grow our network, we will have multiple VPCs. We have the option to use VPC peering connections, but that quickly becomes unmanageable. As noted in the AWS Documentation, "you must maintain routing tables within each VPC and connect to each onsite location using separate network gateways".
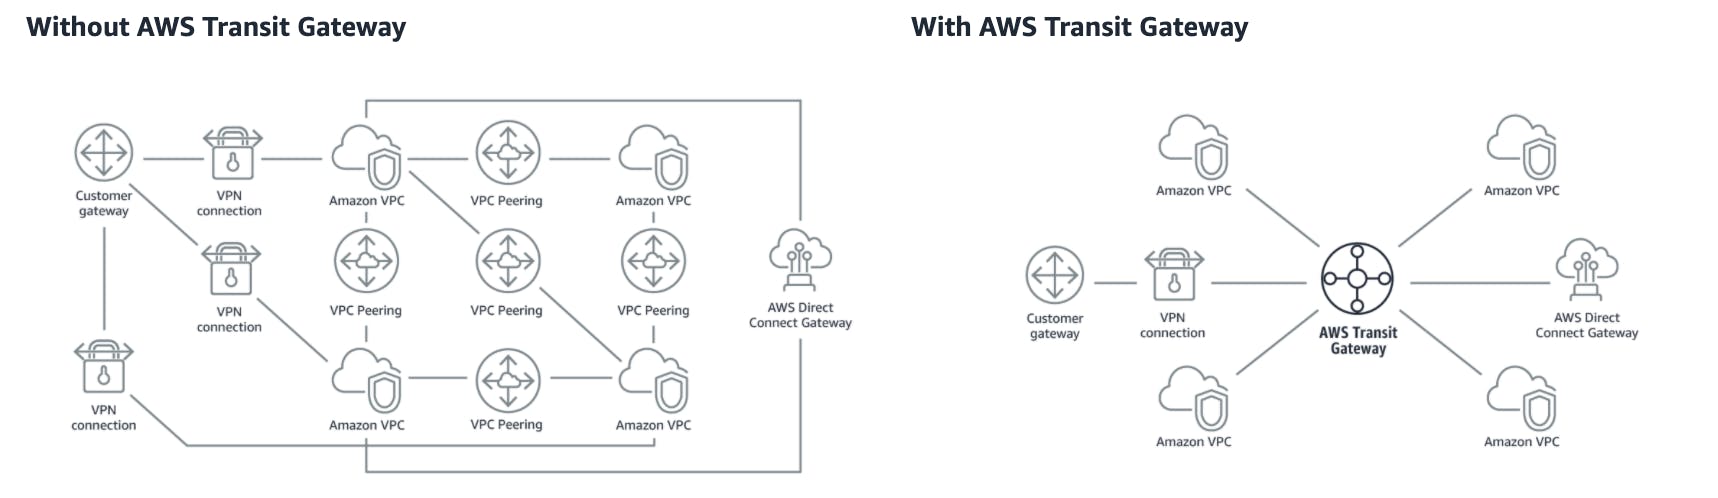
This encourages reliability and predictability in your infrastructure.
Performance Efficiency
Go global in minutes
The Transit Gateway also allows us to peer into other regions or Inter-Region Peering. This allows you to build a global network that can connect over many different regions. This allows the connection to stay on the AWS network and while having a global reach.
Cost Optimization
Analyze and attribute expenditure
For certain use cases, Direct Connect (DX) can be cheaper than this VPN connection. That is given that we will be establishing the connection for a longer timeline. If we will only be utilizing a connection for a short period of time, the VPN connection could be cost-efficient. Direct Connect takes longer to set up and has higher upfront costs.
The VPN connection does not take long to set up (~1 hour) and might be necessary to save if using for shorter lengths of time.
Takeaways
Setting up these VPN connections is fairly quick and painless once you understand how all the infrastructure interacts. These demos are huge learning opportunities for me. I'm able to enhance my AWS knowledge and skillset by going through this process of completing demos and writing about it.
I appreciate everyone who made it this far! I am looking for Junior opportunities working with AWS.
Check out the resume I built on AWS: Cloud Resume Connect with me on LinkedIn or follow me on Twitter Thanks to Adrian Cantrill for the great demo, check out his courses: https://learn.cantrill.io/